Integrate PMM with Percona Platform
Percona Platform brings together database distributions, support expertise, services, management, and automated insights.
Connect your PMM servers to Percona Platform to boost the monitoring capabilities of your PMM installations and manage database deployments easier. In addition, you get access to PMM updates, automated insights, advanced advisor checks and more alert rule templates.
Connect PMM to Percona Platform
You can connect to Percona Platform with a Percona Account or via Google or GitHub authentication. If Percona Support has enabled a custom identity provider for your account, you can also log in using your company’s credentials.
We recommend that you connect with a Percona Account, as this gives you access to other Percona services, including Percona Platform, Percona Customer Portal, and Community Forum. If you don’t have a Percona Account, you can create one on the Percona Platform homepage using the Don’t have an account? Create one? link.
Prerequisites
To ensure that PMM can establish a connection to Percona Platform:
Upgrade to PMM 2.27.0 or later
Before connecting your PMM server to Percona Platform, make sure you are using PMM version 2.27 or newer. Otherwise, upgrade your PMM installation beforehand.
This is required because, starting with PMM 2.27, Percona Platform has replaced username/password authentication with access token authentication. Access-token authentication increases security and enables federated identity.
This change did not affect existing connections to PMM Platform, which were not automatically terminated.
For more information, see Install and set up PMM.
Check that you are a member of an existing Platform organization
-
Log in to Percona Platform using your Percona Account. If you are connecting via GitHub, make sure you set your email address as public in your GitHub account. If your email address is private instead, Percona Platform cannot access it to authenticate you.
-
On the Getting Started page, check that the Create organization step shows an option to view your organization.
Contact your account administrator or create a new organization for your Percona Account if this is the case.
Set the public address of your PMM server
PMM automatically detects and populates the public address of the PMM server when this is not set up. If you need to set it differently, go to Settings > Advanced Settings and edit the Public Address field.
Connect PMM to Percona Platform
To connect your PMM server to Percona Platform, copy your personal access token from Platform Portal and paste it into PMM. You will find your access token in Platform Portal as part of your user profile page.
Token validity
For security reasons, access tokens expire after 30 minutes. Make sure to paste the code before that, or generate a new one if it expires.
To connect your PMM server to Percona Platform:
-
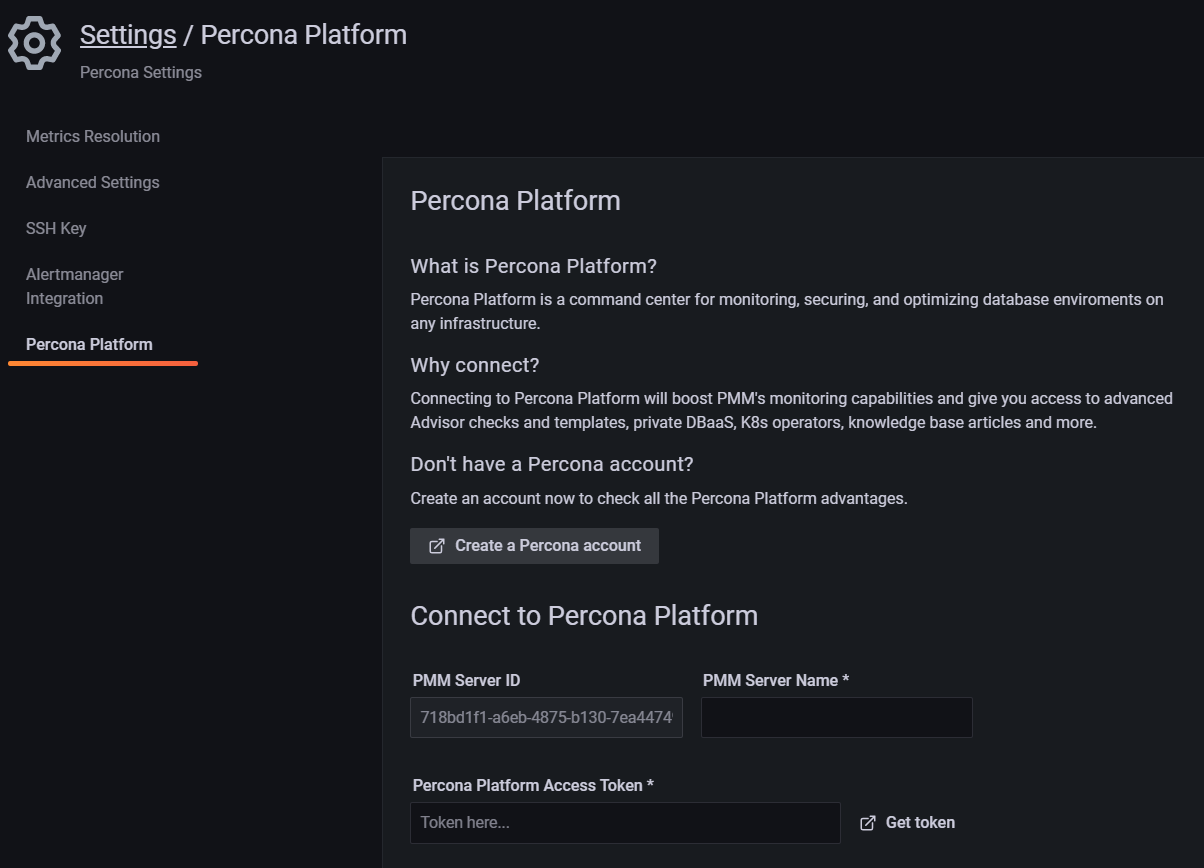
In PMM, go to Settings > Percona Platform tab to fill in the Connect PMM to Percona Portal form:

-
The PMM server ID field is automatically populated with the ID identified for your PMM instance. Enter the name of your PMM instance and click Get token to go to Percona Platform Portal and generate your access token.
- Log into Percona Platform using your Percona Account (if you don’t have an active current session).
- On the Profile Settings page, copy the code from the Percona Platform Access Token field.
- Back into PMM, paste the Access Token into the Percona Platform Access Token field, and click Connect.
To confirm that you have successfully connected the server and check the list of all servers currently connected to an organization, go to Percona Platform > Dashboard tab and click View Instances next to the Connect your PMM step.
Check Percona Portal entitlements
After connecting to the Percona Platform, PMM has access to additional alert templates, Advisor checks, and account information. See Check Percona Portal account information.
Disconnect a PMM instance
Disconnect a PMM instance when you want to unlink it from your Percona Platform organization or stop monitoring it there.
To disconnect a PMM server, go to Configuration > Settings > Percona Platform and click Disconnect.
Disconnecting instances as an Admin
In situations where you are not able to disconnect servers yourself, ask your PMM Admin to disconnect the server for you. For example, you may not be able to disconnect servers when PMM is moved to a network segment without outbound connections to public networks.
Availability
This feature is available starting with PMM 2.29.0.
If you cannot disconnect servers yourself, ask your PMM Admin to disconnect the server for you. For example, you may not be able to disconnect servers when PMM is moved to a network segment without outbound connections to public networks.
If you are a PMM Admin, you can terminate any connections to Percona Platform, even if you are not logged into PMM with a Percona Account. However, we recommend logging in with a Percona Account before disconnecting servers, as this will automatically remove the disconnected servers from Percona Platform as well.
If you do disconnect servers without being connected with a Percona Account, you’ll have to manually remove the unavailable servers from Percona Platform. This ensures that your list of connected PMM instances stays up-to-date in Percona Platform.
To do this, go to PMM instances, and remove any servers that you have already disconnected from PMM.
Sign into PMM with your Percona Account
Once you’ve successfully connected your PMM instance to the Percona Platform, you can also sign into PMM using your Percona Account:
- Log out of your existing PMM session.
- On the PMM login screen, click Sign in with Percona Account. If you have an active Percona Account session on the same browser, PMM will log you in automatically. Otherwise, enter your Percona Account credentials to start a new session.
Get expert help
If you need assistance, visit the community forum for comprehensive and free database knowledge, or contact our Percona Database Experts for professional support and services.